Getting started
This document contains an explanation on how to build entire operating system from source.
Scripts in the repository are usually written for bash. On Windows, install WSL and continue from there. On Mac OS, it is recommended to use the Docker setup.
The operating system requires its own compiler and toolchain, which must be set up once. It is strongly recommended to use the Toolchain via Docker since it simplifies the setup a lot. If you want to install the toolchain on your host system, check the Toolchain on host section.
|
Note
|
The system root directory sysroot is reflects the filesystem of the target system. All libraries and applications are installed into this directory, which is then packed into the ramdisk during the build process. This ramdisk is what is mounted as the root of the running system.
|
Toolchain via Docker
To run the toolchain in a Docker container you can either build the image yourself or pull the latest image from the GitHub repository.
Option A: Pull latest image
-
Pull the image:
docker pull ghcr.io/maxdev1/ghost-toolchain-64:1.0
-
Start a container and mount the repository to it:
docker run -it --name ghost-toolchain -v "$(pwd):/ghost/source" ghcr.io/maxdev1/ghost-toolchain-64:1.0
-
Go to the Build targets section below.
Option B: Build image
-
To get started, clone the repository:
git clone https://github.com/maxdev1/ghost
-
Within it, execute the following script. This will build the Docker image
ghost-toolchainwhich includes everything required to build the operating system. Check the/ghost-build.logfor outputs. This script will take a while../docker-build-toolchain-image.sh
-
Once the image was built, a container will automatically be started. You can now skip to the Build targets section below.
Tips
To reconnect to the container after exiting it:
docker exec -it ghost-toolchain bash
Toolchain on host
Clone repositories
To get started, clone the repository to /ghost/source:
git clone https://github.com/maxdev1/ghost /ghost/source
If you want to use a different folder, see the "Tips" section below.
Installing prerequisites
The following dependencies are requirements for the toolchain and need to be installed beforehand or else the script will fail:
-
apt-get update -
apt-get install libmpfr-dev libgmp-dev libmpc-dev autoconf2.69 pkg-config xorriso grub-pc-bin make texinfo flex bison gcc g++ nasm asciidoc asciidoctor
You may need to export AUTOCONF=autoconf2.69 depending on your host system.
Build toolchain
Run the toolchain setup script toolchain.sh. It will attempt to do everything that is
necessary to create the toolchain. Once the toolchain was built, add it to your PATH.
Build targets
The root build.sh contains a set of targets that will build everything required for the system (see --help).
After setting up the toolchain, simply run ./build.sh and let it execute all targets. The first build will take some time, because the ported libraries (like cairo) need to be built.
Done? Congratulations! In the target folder you will now find the bootable ISO image ghost.iso.
|
Note
|
On some systems while running build.sh, the configure scripts of some ports
might hang at either "checking for suffix of executables" or "checking whether
we are crosscompiling". Run killall conftest to get it running again.
|
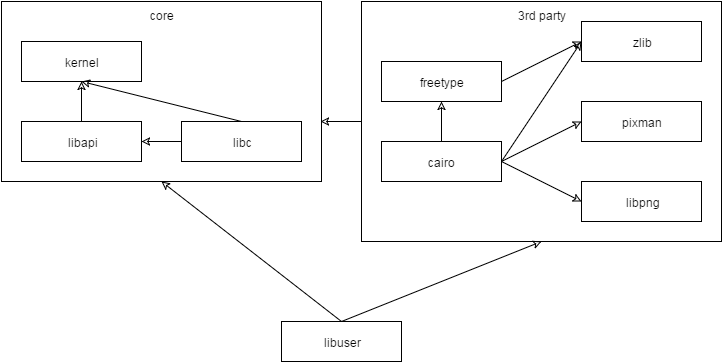
Library dependency
To give a small overview on the dependencies, libapi is the lowest layer library that provides wrapping of system calls. On top of this is the libc that utilizes libapi.
Third-party software
To install third-party libraries, it is usually necessary to provide some parameters to the
./configure script:
-
--host=i686-ghostto set the correct host -
--prefix=/systemto install libraries to the correct folder
There is also a simplified port installation script in patches/ports that allows automatically
downloads, patches and installs some third-party libraries.
Creating a bootable USB stick
You can create a bootable USB stick with the following steps.
-
Convert the
image.isofile to an .imghdiutil convert -format UDRO -o converted.img image.iso
-
Find out which drive the USB stick is with
diskutil list
-
Unmount the disk
diskutil unmountDisk /dev/diskN
-
Write the image to the stick
sudo dd if=converted.img of=/dev/rdiskN bs=1m
-
Unmount it again
diskutil unmountDisk /dev/diskN
Tips
-
To specify a different toolchain base directory, modify
TOOLCHAIN_BASE, copy thevariables.sh.templatetovariables.shand specify the variable with an export. -
While binutils and gcc are being built, the log output is redirected to a file named
ghost-build.login the respective build directory in the temporary folder. If the build fails for some reason, you should check this log file.